
In Part 1 we built the basic shape of a custom timeline connector: defining the interfaces, wiring up the core methods, loading data, and making the control happy enough to render your records.
Now it’s time for something users will actually notice: filtering.
Filtering is the magic that lets them stop scrolling like maniacs and see only the subset of records they care about.
This part walks through the concepts, the UI, and the backend logic you’ll need to support filtering in a clean, reliable way.
What filtering means in a custom timeline connector
Filtering in the timeline connector isn’t fundamentally different from filtering list views or subgrids. The twist is that the timeline expects the filtering logic to live inside your connector, not the platform.
Your connector decides:
- what filters exist
- how they’re displayed
- how they get translated into queries
- how results are refreshed
Typical use cases:
- show only records of a specific type
- filter by status
- filter by date range
- narrow the timeline to only assigned-to-me records
The timeline doesn’t enforce a specific model. That freedom is great right up until you have to design it, because the platform itself has no idea how your data source works. It doesn’t know:
- what backend you’re querying
- how your records relate to each other
- what your entity schema looks like
- whether your data even supports server-side filtering or sorting
- or if the source is something exotic like an external API, a custom index, or a flat stream of events
So the platform pushes that responsibility onto the connector: you expose filters, you translate them, you execute the query.
This avoids assumptions, but it also means the entire UX, query model, and edge-case handling lands on the connector developer.
There is an argument to be made that the platform could improve this. For example:
- If connectors could optionally implement a standardised interface describing their schema and sortable/filterable fields, the timeline could handle some logic itself.
- The platform could do client-side sorting when appropriate.
- The control could validate filters before they hit your backend.
- Or at minimum, the connector could declare which operations (sorting, grouping, filtering) are supported by the backend and let the timeline enforce those rules.
But for now, the connector is fully responsible. You define the filtering surface, and the platform stays agnostic.
Extending the connector interfaces
In Part 1 we introduced the basic interfaces. Now we expand them with fields responsible for filtering.
At minimum, you will need to enrich:
- getFilterDetails – tells the timeline what filters your connector supports
- getRecordsData – actually respects those filters when loading items
- internal state objects – store current filter selections from the UI
I like to keep things clean so I’ll implement a separate class for doing the filtering:
After adding that to the project and removing unused code we can start filling in the blanks.
Designing the filtering UI
Your connector controls its own UI. This means you decide how the user picks filters:
- dropdowns
- date pickers
- text fields
- toggles
But the timeline expects your UI to expose:
- what filters exist
- when they change
- how to reset them
All filtering UI should feed into one internal state object, something along the lines of:
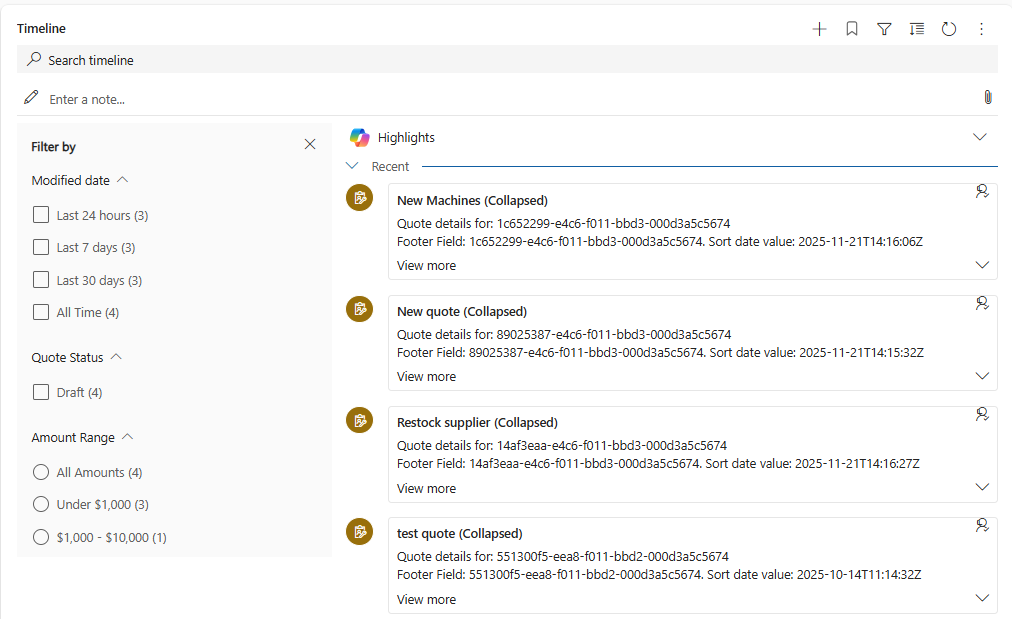
I decided to use single- and multi-select options in the getFilterDetails filtering status, modified date and quote amount. In each case you need to provide all possible filter options and then handle each one in your connector.
After you build and publish you should see the filters in your app:
The only problem is, those will work only for your connector, so good luck explaining that to your users 😉
Also, there is a bug in Power Platform code that fails to render the timeline items if you try to filter the records and you have both regular activities and custom records. It’s still a thing in November 2025 ¯\_(ツ)_/¯
But leaving that for a moment, we can also run a text filter by tapping into the search timeline textbox. It’s in the filter.searchKey (IFilterRequest interface). You can see it in action here:
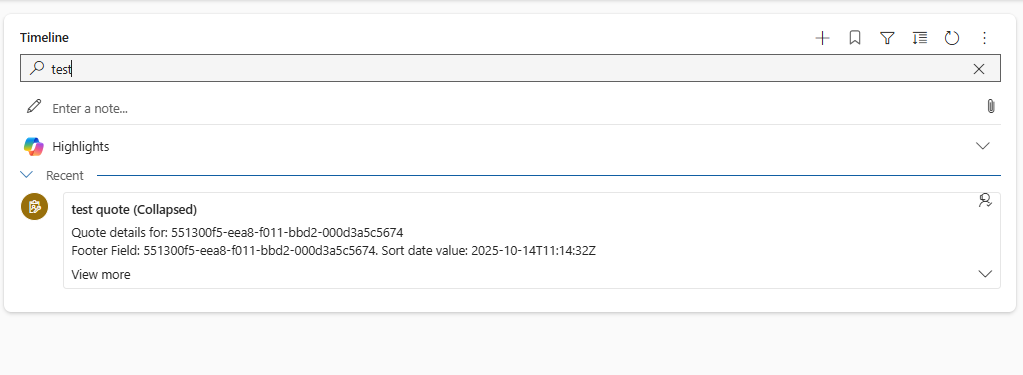
The code behind is in a applySearchFilter method which is called on fetched records. We can also implement this as a filter criteria in a similar way to the above filters and include in the fetchXml, but I thought a little variety might be in order:
Whenever the user changes something, you simply:
- update the filter state
- call a refresh
- timeline requests data using updated filter
- you return a filtered dataset
Nothing magical; just plumbing.
Translating filter UI into FetchXML or OData
This is where the real work happens.
Your connector receives filter parameters. Now you must convert them into a real FetchXML or OData query.
Keep it simple:
- If status filter exists, add a <condition>.
- If date filter exists, apply ge or le operators.
- If type filter exists, change the entity queried or add another condition.
Example skeleton (intentionally incomplete):
Sorting & pagination interaction
Filtering resets the timeline’s paging context.
If the user applies a filter, your connector must:
- reset continuation tokens
- run the query from page 1
- regenerate sorting logic (because filtered data may require a new order)
The timeline control expects consistency. If you sort by createdon descending once, all further pages must follow the same logic or the control starts misbehaving.
Let’s sort this out (pun intended) by expanding getFilteredQuotes by this little snippet:
Also, remember to handle any exceptions 🙂
Performance considerations
Filtering can make queries cheaper or stupidly expensive. Your call.
Guidelines:
- only fetch attributes you display
- avoid huge OR filters
- limit date windows if possible
- do not fetch 1000 records and filter client-side
- sanitize inputs before building XML
Summary and what comes next
By the end of this part, your connector:
- exposes available filters
- stores current filter settings
- generates queries dynamically
- returns only relevant records
- plays nicely with the timeline control’s paging and sorting
Part 3 will focus on rendering the perfect card. Stay tuned and happy coding!


